Monday, August 27, 2012

Awesome Egg Salad (with avocado!!)


Do you ever just really crave eggs?  More specifically, hard boiled eggs??  Even more specifically, egg salad???  Well, I do…and tonight I did.  I just couldn’t wait to get my hands on a big ol’ egg salad sandwich.  I thought about this sandwich for hours.  I decided to see what I could find on allrecipes to make my egg salad a bit snazzier.  I found several recipes that had some good add-ins to your standard egg salad, and picked the ingredients that sounded best to me.  This sandwich was fantastic, I highly recommend it on toasted wheat bread with some fresh baby spinach.  This recipe should make 3 or 4 sandwiches (maybe more, depending on how thick you put that egg salad on and how big your bread is).

I think a lot of foods are not very photogenic
(and also, I'm not a very good food photographer)
I have to be honest with you about this recipe, besides the 4 eggs and 1 avocado, I did not measure a single other ingredient.  So I really have no clue how much of what went into this.  I tried to do some guesstimating here based on other recipes and what I think I did.  Also, I didn’t mash in my avocado, I just stirred in the cubes (but mashing seems like a good idea).
Oh, and just in case you have a hard time getting your hard-boiled eggs just right, try our friend Erin’s instructions at Chopstitch.  This is how I make my eggs and they always turn out just right!

Ingredients
4 hard-boiled eggs
1 large avocado – peeled, pitted & cubed
¼ cup mayonnaise
1 tbsp mustard
1 tbsp finely diced onion
½ tsp paprika
1 ½ tsp horseradish (or more…or less…as hot as you like it)
salt & pepper to taste
baby spinach (optional)

Instructions
Everything is better with baby dills.
1)  Mash eggs in a mixing bowl with a fork.  Stir in all the rest of the ingredients with fork, and gently mash until blended.  Slap your egg salad on two slices of bread with spinach.


Enjoy!
 ~ j

Tuesday, August 21, 2012

Sweet & Sour Chicken and Broccoli


This recipe is adapted from a Pinterest find.  I’m totally addicted to Pinterest, but hadn’t actually done much of anything with any of my pins…until the last few weeks.  I have projects going all over the house now, which means it’s a disaster ‘round these parts.  I really need to start making more of the recipes I’ve pinned, though.  So here’s the first one I’m sharing.  Like I said, I adapted it some…broccoli wasn’t part of the original recipe, but seemed like a good addition to me!  I also adjust some of the measurements from the original and added Sriracha (just because I love it).  As you can tell from the photo, I didn’t have much broccoli in the house, or I would have put in a lot more (which is also why I didn’t put any measurement/amount on the broccoli, you decide).

Anyways, like I said, I haven’t actually made many of the recipes I’ve pinned.  I have a feeling a lot of them are not really winners, they just sound good in theory.  But this one is definitely a winner, and a great alternative to Chinese take-out!


Sweet & Sour Chicken and Broccoli
Ingredients
2/3 cup white sugar
4 tbsp ketchup
½ cup white vinegar
1 tbsp soy sauce
1 tsp garlic powder
dash (or more) Sriracha hot pepper sauce (optional)
~1.5 lbs boneless chicken breasts
salt & pepper
1 cup cornstarch
2 eggs, lightly beaten
¼ cup canola oil
broccoli, cut up into bite-size pieces

Instructions
1) Preheat oven to 325 degrees F.
2) Mix together sugar, ketchup, vinegar, soy sauce, garlic powder and Sriracha.  Set aside.
2) Cut up chicken into bite-size pieces, season with salt and pepper to taste.  Dip chicken into eggs to coat, then dip in cornstarch until well coated.
3) Heat oil in a large skillet and drop chicken in, cook just until slightly brown, but not cooked through.
4) Place the chicken and broccoli in a lightly greased 9”x13” baking dish, and pour the sauce over all it.  Cook for 45-60 minutes, turning chicken about every 15 minutes.

Enjoy!
 ~ j

Friday, July 13, 2012

Ravioli and Butternut Squash Sauce

Holy tastebuderific dinner I made tonight!  Yeah, I don't know, I was trying to come up with a fun, made-up word for super delicious taste times.  ANYWAYS...

I bought this big ol’ butternut squash the other day totally on a whim.  I love squash, but had nothing in particular in mind that I was going to do with it.  Today I decided I wanted to do something with that squash and some pasta, and then I remembered I had some cheese ravioli…it sounded like a fantastic idea (and it was a really fantastic, that’s why I’m sharing).  I really wish I could tell you that I made the ravioli, and then give you an awesome recipe for it, but I've never made pasta in my life.  So anyhow, I did a quick interwebs search and found this recipe, which was perfect because I also have a shit-ton of 2 different types of basil growing in my garden.  I only very slightly strayed from the recipe I found, and here’s what I did.  This was so delicious, you should go get a squash right now and start cooking.

Yep, that's Beeb, eating squash out
of the food processor.

Ingredients
Your favorite cheese ravioli (in whatever amount you want)
1 medium to large butternut squash, roasted
   (I’ll give roasting instructions, in case you’re not sure about that)
1-2 cups half &half
½ cup grated parmesan cheese
3 tbsp fresh basil, torn
cayenne pepper (optional - use as much as you'd like, I like my food spicy!)
salt & pepper to taste

Instructions
1) Cook ravioli according to package instructions. 
2) While your ravioli is cooking, place squash, approximately 1 cup half & half, cheese, basil and cayenne pepper in food processor.  Blend, and add half & half until the sauce reaches a consistency you like (I like it thicker, so I only used about a cup).  Add salt & pepper to taste, if desired (I didn’t add any, I thought it was perfect as is).
3) Drain ravioli and spoon desired amount of sauce over the top.

**My squash was still hot when I put it in the food processor, so I didn’t heat it at all after I blended it…you may want to heat your squash sauce after blending it.

Roasting the squash:  Pre-heat the oven to 400 degrees F.  Cut the squash in half lengthwise, scoop out seeds, place in a 9”x12” baking dish (cut side up), put approximately 1 tbsp butter in each side and sprinkle with a little salt and pepper (I also sprayed a little bit of olive oil all over the squash, but it’s not necessary).  Place the squash in the oven for 30-45 minutes (until the squash is all soft and can be easily scooped out).

Enjoy!
 ~ j

Monday, June 25, 2012

Sriracha-Lime Popcorn

This is delicious.  I'm not sure where I got this one from, so if you've seen it somewhere else, let me know and I'll give credit where it's due.  No measurements, I just can't do it.  I think I'm going to start posting the stuff I make with no measurements.  That is, honestly, the only thing holding me back from posting more recipes.  I'm incapable of measurement.  I make all sorts of great dishes and take photos of them, and then I don't know how to write them up because I just don't measure.

ANYHOW...here is a delicious mix of stuff to put on your popcorn.  Please don't use pre-packaged microwave popcorn, that stuff is poison and you're just killing yourself with it.  I have a Stir Crazy popper that my sis-in-law gave me for Xmas, and I love it!


Ingredients
popcorn
butter
Sriracha amazing hot chili pepper sauce (as much or as little as makes your mouth happy)
lime juice (you don't need a lot...experiment with it to your liking)
salt (optional)

If you know how to make a bowl of popcorn
look exciting and photogenic, let me know.
Instructions
1)  Pop your popcorn.
2)  While the corn is popping, melt the butter using whatever method you like.
3)  Whisk the Sriracha and lime juice into the melted butter.
4)  When the popcorn is done, pour the butter mixture over the top a little bit at a time, stirring the popcorn around with each pour.  Shake salt on top if you'd like.

enjoy!
 ~ j

Wednesday, May 2, 2012

Homemade Ginger Ale!!

Homemade ginger ale!!  How great does that sound??  Okay, so I definitely did not come up with this recipe on my own.  I got this directly from my new favorite book “Make the Bread, Buy the Butter” by Jennifer Reese.  Seriously, I LOVE this book!  It’s more than just a cookbook or how-to book, it’s also full of great stories from the author’s life…like the good and the bad of raising chickens and goats in her family’s suburban backyard.  Including a highly entertaining attempt at raising their own Thanksgiving turkey(s).  The book is funny and witty, and SO informative.  Reese gives an overview of many common foods we buy all the time (Oreos, cream cheese, mustard...over 120 recipes!).  Reese breaks each item down by cost and hassle to determine whether you should buy it or make it (hence, the title of the book), and then gives a recipe or two or three.


Buy this book!!

Ginger ale seemed to call to me.  We don’t drink soda very often at our house, but when we do it’s almost always ginger ale.  The thought of making it myself with all-natural ingredients was extremely appealing, and this is a great recipe.  That being said, I didn’t quite follow the recipe, but I should have, and next time I will.  What did I do differently?  Well, I used active dry yeast instead of instant because that’s what I had in the house.  I didn’t have a lemon, but I did have lemon juice…so it’s very possible I didn’t even come close to adding the correct amount.  And I skimped a little on the ginger because I was being lazy and tired of grating it.  I definitely should have added more ginger, it’s such a great flavor!!  Oh, and by the way, Reese's verdict is “make it.”  She compares Canada Dry at about $1.79 for a 2-liter bottle and the homemade version at about $1.59.  DO NOT go and try to compare this to some cheap shit, generic ginger ale because that stuff sucks ass…it doesn’t even have ginger in it!  Now make some of this, mix it with a little dark rum and have yourself a fabulous dark 'n' stormy!

Ginger Ale
Props to Terrapin
Ingredients
1 lemon
2 tbsp finely grated fresh ginger (~2” chunk)
1 cup sugar
¼ tsp instant yeast
cold tap water
Empty 2-liter plastic bottle with a screw-on cap to put it all in

Instructions
1) Place funnel in the mouth of 2-liter bottle.  Juice the lemon and strain the juice in the bottle.
2) Add the ginger, sugar and yeast.  It’s okay if some is stuck to the funnel, the water will flush it out.  Pour in enough water to fill the bottle and cap tightly.
3) Gently shake to mix up all the sediment (ginger, sugar, yeast).  Press on the bottle, you’ll notice there’s a little give.
4) Let the bottle sit at room temperature for about 24 hours.  You’ll know the soda is done when you press on the bottle again and there’s no give.  Put the bottle in the fridge, and as soon as it’s cold, it’s ready to drink!  If you don't want the ginger "pulp," strain it into a glass to drink.
*Open the bottle with care, it may be very bubbly.  Finish off within a few days, as it will lose its effervescence.

enjoy!
~ j

Wednesday, March 7, 2012

Balsamic Glazed Vegetables


I don’t remember where I found this recipe (somewhere on the interwebs), but the original recipe called for regular balsamic vinegar.  I’ve made these veggies a couple times now, with regular balsamic and white balsamic...I definitely preferred them with the white balsamic.  You can use all different veggies in it, so it’s a great recipe for using up random veggies in the fridge.  I also like it because I always make brussel sprouts exactly the same way, and they’re great, but it’s nice to have at least one other way to prepare them.  Alrighty…here we go…

Ingredients
1 ½  - 2 lbs of your choice of carrots, brussel sprouts, yellow squash, broccoli, cauliflower and zucchini (I used 1 lb brussel sprouts, 4 medium-large carrots, ½ head of cauliflower)
½ cup water
½ cup white balsamic vinegar (or regular balsamic vinegar)
1 tbsp butter
salt & pepper
Have I mentioned that I grew up under the rule of having
green, orange/yellow and white veggies with every meal?
Instructions
Place the veggies in a pan with the water and vinegar.  Bring to a boil, then reduce heat and cover.  Cook for 10 minutes.  Remove the lid and turn the heat back up.  Allow the water to boil away and the vinegar to reduce and glaze the veggies, about 5-7 minutes.  When the veggies are glazed, add the butter to the pan and turn veggies all around to coat.  Season with salt and pepper and serve.

All ready to serve with venison cube steaks
(thanks to my "little" brother, the deer slayer).

enjoy!
 ~ j

Wednesday, February 15, 2012

Scallops with Kale and White Beans

*warning *** my photography skills are deteriorating*** but hey, I actually got a shot of this one* 

I got this recipe from Whole Foods – modified it slightly – and bam, it became one of my new favorite meals.  We planted kale for the first time this year and have decided that we like it.  It holds up its texture unlike other greens, so you don’t need as much as you would for spinach.  We like it, and are definitely planning on planting many more plants next year.  

Besides having few ingredients, it only dirtied one pan! SCORE!  I think the simple nature of this dish really allows the scallops to shine.   It's got a delicious earthy taste from the kale and the salty goodness of the sea from the scallops.  And, as a bonus, it’s good for you- low in fat and low in calories, high in fiber and vitamins!  Sometimes, the ‘good for you’ meals seem to be lacking in flavor or zing, this one does not disappoint. 
 
 What you need: Serves 4.

1 can of white beans, drained and rinsed
1 lb scallops
10 medium sized kale leaves, destalked and torn into quarter sized pieces
5 garlic cloves (I probably used more, you may want to use less)
2 tablespoons olive oil
1 teaspoon red pepper
½ lemon
dash of sea salt

What you do:

Heat a pan over medium heat, add half the olive oil and garlic, sautee for a minute or two then dump in kale, sautee for 2 more minutes, add beans and red pepper and let them warm up, stirring frequently.  When they are warmed - maybe about 5 minutes – transfer to a bowl (I used the bowl we served them in) and cover to keep warm.  Into the pan, add the other half of the olive oil, turn up the heat to medium-high, and sear the scallops on each side, about a minute depending on size, juice lemon over the top,  and place over the bed of the kale/bean combo. Sprinkle with sea salt and serve right away.  From start to finish, even with prep, this meal only takes about 15 minutes. Excellent, I say!  

Enjoy!
-h

Monday, January 23, 2012

Veggie Sides


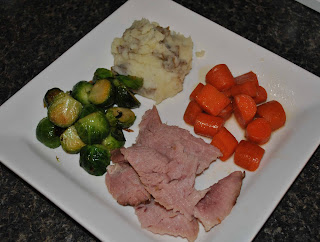
I missed my recipe last week, but in my defense I was out of town for the better part of the week…and that’s my only excuse.  So here’s a recipe to make up for last week, and I'm planning to post another later this week.  In my book, that will still keep me at a recipe a week.  :)  And have you noticed my new white, square plates?!  They were a Xmas gift from mother-in-law, and I think they make my food photos look so much nicer…I love them!

I cooked a bone-in ham a few weeks ago for the first time.  I’m not going to bother with that “recipe,” because I did nothing but follow exactly what the plastic wrap on the ham told me to do (325 degrees F for 10-12 minutes per pound of ham).  But I thought I would share the sides I made to go with the ham.  These are very basic veggie side dishes that you could put with just about any meal, and you can definitely change up all the amounts of ingredients to your own tastes…in fact, I don’t even give measurements here on my mashed potato recipe, because I have no clue what I do (and this time I was just scraping the bottoms of containers for whatever was left in them).

Colorful!
Glazed Carrots
Ingredients
4 large carrots - washed and cut into bite-size pieces
1 tbsp butter
1 tbsp brown sugar

Instructions
1)  Steam carrots to desired softness.
2)  Melt butter and sugar in pan, add carrots and sauté until evenly coated.

Brussel Sprouts with Garlic
Ingredients
1 lb (I think) Brussel sprouts - washed, trimmed and cut in half
2 tbsp olive oil
4 large garlic cloves, minced
Salt & pepper to taste (optional)

Instructions
1)  Heat oil in pan over medium heat, add garlic and sauté for a minute or two. 
2)  Add brussel sprouts cut sides down, also add salt and pepper if desired.  Sauté for a few minutes, until cut side is just starting to brown, then stir sprouts around (not worrying about what side is down).  Cover pan with lid and continue to cook until you reach desired softness (I prefer mine crunchier, Squatch prefers his a bit mushier).

Mashed Potatoes
Ingredients
Potatoes, washed and cut into small pieces
Whole garlic cloves
Milk
Sour cream
Butter
Parmesan cheese
Fresh or dried herbs of your choice (basil, oregano, parsley, chives, etc…)
Salt & pepper

Instructions
1)  Boil potatoes and garlic cloves in large pot of salted water, until potatoes are very soft.
2)  Drain water from pot, then add milk, sour cream, butter and parmesan cheese.  Mash with a potato masher or hand-held electric mixer.  Mix in herbs and salt & pepper.

enjoy!
 ~ j

Tuesday, January 10, 2012

Not Just ANOTHER Seven Layer Dip

I don't call this a seven layer dip, because it seems to me that it has more than seven layers.  I guess it all just depends on what you consider a "layer."  ANYWAYS...I love this dip, and every time I've taken it to a party, I've been asked for the recipe.  So it seemed like a good one to share as we approach the Super Bowl holiday season.

Ingredients
3 cups shredded lettuce
1 (15 oz) can black beans, rinsed and drained
2 chopped fresh red chile peppers
1/4 cup sliced green onions
1 (8 oz) container sour cream
2 fresh jalapenos, very finely diced
1 tbsp grated lime zest
1 cup chunky salsa
1 avocado - peeled, pitted and diced
3/4 cup shredded Monterey Jack cheese
1/2 cup chopped black olives, drained
2 tbsp chopped fresh cilantro
Delicious corn chips (like Tostitos with lime...YUM!) for serving

Instructions
1) Layer shredded lettuce on a 12" serving platter.

2) In a medium bowl, stir together black beans, red chile peppers and green onions.  Spoon the mixture evenly over the lettuce.

3) Gently spread sour cream over the beans.  Sprinkle with jalapeno peppers and lime zest.

4) Drain excess liquid from salsa.  Spoon salsa over sour cream layer.  Place avocado chunks on top of salsa (OR you can mix the avocado into the salsa before you spoon the salsa on).

5) Sprinkle with Monterey Jack cheese.  Top with black olives and cilantro.  Serve immediately, or chill in refrigerator.
TA DAAAA!!!
enjoy!
 ~ j

Wednesday, January 4, 2012

Butterscotch Blondie Bars with Peanut-Pretzel Caramel

I haven't actually made this recipe myself, YET, but this was the winner of the cookie exchange I hosted.  It was a Xmas cookie exchange, but these are definitely way more than just a Xmas cookie.  My friend Maria made these, and they were simply fabulous in all of their gooey, sweet and salty splendor!  So how did we pick a winner?  We sequestered Squatch in the bedroom and had him taste every cookie, we really had to force feed him to make that happen.

Someday I'll try to get a better photo to put here...


Butterscotch Blondie Bars with Peanut-Pretzel Caramel
Yield 40 cookies
Ingredients
BLONDIE
1 1/2 cups flour
2 tsp baking powder
1 tsp kosher salt
3/4 cup unsalted butter
2 cups packed light brown sugar
2 large eggs
1 tsp vanilla extract

PEANUT-PRETZEL CARAMEL
4 cups roasted unsalted peanuts
2 cups sugar
1/4 cup honey
1/4 cup unsalted butter
1/2 cup heavy cream
1 1/2 cups 1 1/2"-wide thin twisted pretzels, coarsely crushed

Instructions
BLONDIE
1)  Preheat oven to 350 degrees F.  Line 9"x13" baking pan with parchment paper, leaving 1" hanging over on long sides of pan.
2)  Whisk flour, baking powder, and salt in a medium bowl; set aside.
3)  Stir butter in a medium skillet over medium heat until browned bits form at bottom of pan, 7-8 minutes.  Transfer to a medium bowl, and add brown sugar.  Using an electric mixer, beat until well combined and mixture resembles wet sand, 2-3 minutes.  Add eggs and vanilla; beat until fluffy and well combined, about 2 minutes.  Add dry ingredients; beat until smooth (batter will be thick).  Using a spatula, evenly spread batter in prepared pan.
4)  Bake blondie until golden brown, edges pull away from sides of pan, and a tester inserted into the center comes out with a few moist crumbs attached, 20-25 minutes.  Let cool completely in pan on a wire rack.

PEANUT-PRETZEL CARAMEL
1)  Preheat oven to 350 degree F.  Line a rimmed baking sheet with parchment paper.  Spread peanuts over sheet in an even layer.  Bake, stirring frequently, until golden brown and fragrant, 5-7 minutes.  Set aside.
2)  Stir sugar and 1/2 cup water in a large saucepan over medium-low heat until sugar dissolves.  Increase heat; boil without stirring, occasionally swirling pan and brushing down sides with a wet pastry brush, until caramel is deep amber, 12-15 minutes.  Add honey; return to a boil, stirring often, about 1 minute longer.  Add butter; stir until blended.  Add cream (mixture will bubble vigorously); whisk until smooth.  Stir in peanuts and pretzels.
3)  Pour over cooled blondie.  Refrigerate until cool, about 30 minutes.
4)  Run a knife around short sides of pan to release blondie.  Using parchment paper overhang, lift from pan.  Cut lengthwise into 4 strips.  Cut each strip crosswise into 10 bars.  Chill for up to 1 week in an airtight container.  Bring to room temperature before serving.

enjoy!
 ~ j